Showing posts with label Miscellaneous. Show all posts

Monday, November 28, 2011

Homemade Trophy


I cut an idea out of my Family Fun magazine this summer for a home made trophy and saved it for just the right occasion.  And, what do you know?  One came along. 

My friend was turning 40 and I knew it would be the perfect gag gift for her since she loves trophies.  I collected some things that related to her, a few things that are inside jokes, along with some random toys/crap, a plastic cup, a plastic bowl and a tiara. 

Then I spray painted everything gold.


Last I glued it all together.  I used hot glue and nothing melted.  Quick and easy.
And you know what?  She loved it.  My son is asking for his own and wants to know what kind I'm going to make him.


Pin It!

Sunday, October 23, 2011

Eggers Cartoon Contest


Do you remember the Eggers Cartoon Contest from the Sunday newspaper funnies?  They used to run in the Sunday paper each week.  Basically, you drew something that was in the shape of an egg and used the word, "egg" in the title and they'd publish it. 

My mom recently mailed me a box of old school work, report cards, and other childhood things she'd filed away.  Included in the package were two copies of my winning Eggers cartoon from the 1990 local Sunday paper.  Yep, that's right.  My creative side goes waaaaay back.  Here's my copy of "The Little Mermegg."  I was so famous that Sunday they even showed my cartoon in church! 


I enjoyed my five minutes of fame.  Do you remember those?  Did you ever enter?


Pin It!

Sunday, October 16, 2011

Ruler Growth Chart


My parents moved out of their house of twenty-nine years this summer.  And they left their growth chart on the wall.  Painted over.  Never to be seen again.*  So sad.  I was measured on that wall at four years old and many times more into adulthood.  My siblings, nieces, nephews, and even a few neighborhood friends were on that wall.  So many memories.  Seeing that I knew I had to make a growth chart that I could take with me when I move.  I've wanted to make a movable growth chart for four years and just now got around to actually executing it.  I've seen cute ones all over online and found the ruler like ones on Pinterest so copied  one of those.  You can see the one I copied from 517 Creations here.

I purchased a pine board that was 1 x 6 x 6.  I stained it (well, my dad did a coat as well since he was hanging around) with a few coats of Minwax.  I like the stain & polyurethane combo for projects like this - it makes for one easy step.  I measured every inch and drew the lines with a paint pen.  I drew the lines one inch long and every fourth line two inches long.  I printed off a font of numbers I liked, traced them on and colored them in with paint pen as well.  I started, like she did, with the first number six inches up and hung it with the bottom of the board six inches from the floor so that "1" hit 12 inches from the floor.  I wanted it to measure more than six feet since I have some tall brothers...you never know!  Lastly, my dad sprayed it with another couple layers of clear polyurethane to protect that paint. 

I took the kids' measurements I've been saving up and wrote my sons in one color sharpie and my daughters in another.  I added my husband and I and hung it on the wall with 3M picture hangers.  I wanted it pretty flush with the wall so didn't want it hanging on a nail or screw.   Now I've got a chart that can move with us through the years and we can watch how the kiddos grow. 
*To my mom's credit, she did copy over all of the measurements onto a long strip of paper to take with her.


Pin It!

Sand table into waterworks


My parents were in town last week and we made all sorts of fun things with the kids.  One of my favs was this fun water feature for outside. 

We have a Step 2 sand and water table that has a hole for an umbrella in it.  We bought it on Craigslist a couple of years ago sans umbrella so we've always just had a hole in the middle.  We fill it with sand in the spring and when the sand is all gone we just let the kids play with water in it for the remainder of the summer.  I had a an idea to build some sort of hose attachment that would come up through the hole and then fit different pvc pipes and connectors onto similar to the one at the children's museum we frequent. 

On top of being an all around handyman who can build or fix anything, my dad builds fountains and was the perfect expert to build this for us.  After a trip to Home Depot and an hour cutting pvc and assembling pieces, the kids were set with a nozzle to change up all sorts of ways.  From the base you can interchange any pvc pipes and fittings to make the water go wherever you want.   I'll probably add a simple pump in a bucket next summer to replenish the water as it fills up pretty fast. 


He screwed some holes in some end caps to create a sprinkler effect as well.

It's been oddly warm here the last week so they had a few chances to play with it.  The neighbor kids all came over one afternoon and spent two hours playing in the water, filling buckets, and splashing around. 

Thanks again, Pop Pop!  Best.  Idea.  Ever.

Pin It!

Wednesday, August 10, 2011

Kiddie Car Wash


I saw the idea for the kiddie car wash in Family Fun Magazine and since their website had all the plans I knew it would be easy to make. 

And it was.

For my husband.

I emailed him the plans one afternoon and asked him to stop by Home Depot on his way home and get the supplies.  I half expected him to laugh at me and tell me I was crazy but he came home with the supplies and built it that night.  Yep, that's why I love him.  Best. Dad. Ever.
Anyhoo, I did the decorating and instead of lawn chair strips like they suggested, I just bought plastic table cloths and cut them into strips.  Then, I embellished it with a couple of pool noodles.  And this thing has been the hit of the summer.  The kids all went nuts for this basically glorified sprinkler.  We've pulled it out several times since and they always have a blast.  He glued a couple of pieces and opted for a brass connector for the hose but otherwise, we can break it down pretty easily for next year.  Now, go build one.

Pin It!

Saturday, May 14, 2011

Mother's Day Corsage


I copied my girlfriend, Julie's, valentines (remember the party?) and made fabric corsages for Mother's Day gifts.

There are a ton of tutorials on how to singe fabric and make flowers so I didn't do one. I'll just show you my end products. Basically, they are singed layers of fabric, sewn on beads, a little bling on the back and a pin hot glued on. These are the two I made for my mother and mother-in-law.
Then I made a couple for myself while I was at it. They'd be cute on a hair clip as well.

Pin It!

Thursday, May 5, 2011

Pretend Makeup


I found the idea for this play makeup through Tip Junkie's Tip Me Tuesday post a while back. The idea came from here and when I saw it I knew that was my solution to my two year old little girl getting into my makeup. I'm not a fan of pushing them to play with things that are older than they should be playing with but she's constantly in my makeup. Since I've made her her own though, she's left mine alone. Winning! Here she is putting on her makeup in my bathroom while I put on mine.
Basically, you empty out old makeup containers and fill them with nail polish. I went ahead and hit up the dollar store for compacts and bought enough to make some to give as gifts to a couple of their little friends last month. I also bought the nail polish at the dollar store so I didn't have a big variety of colors but it works. I let mine harden in an undisturbed room for a couple of weeks.
I packaged up the ones for gifts with a little cosmetic bag and a set of free brushes I got from Ulta.

Pin It!

Tuesday, March 29, 2011

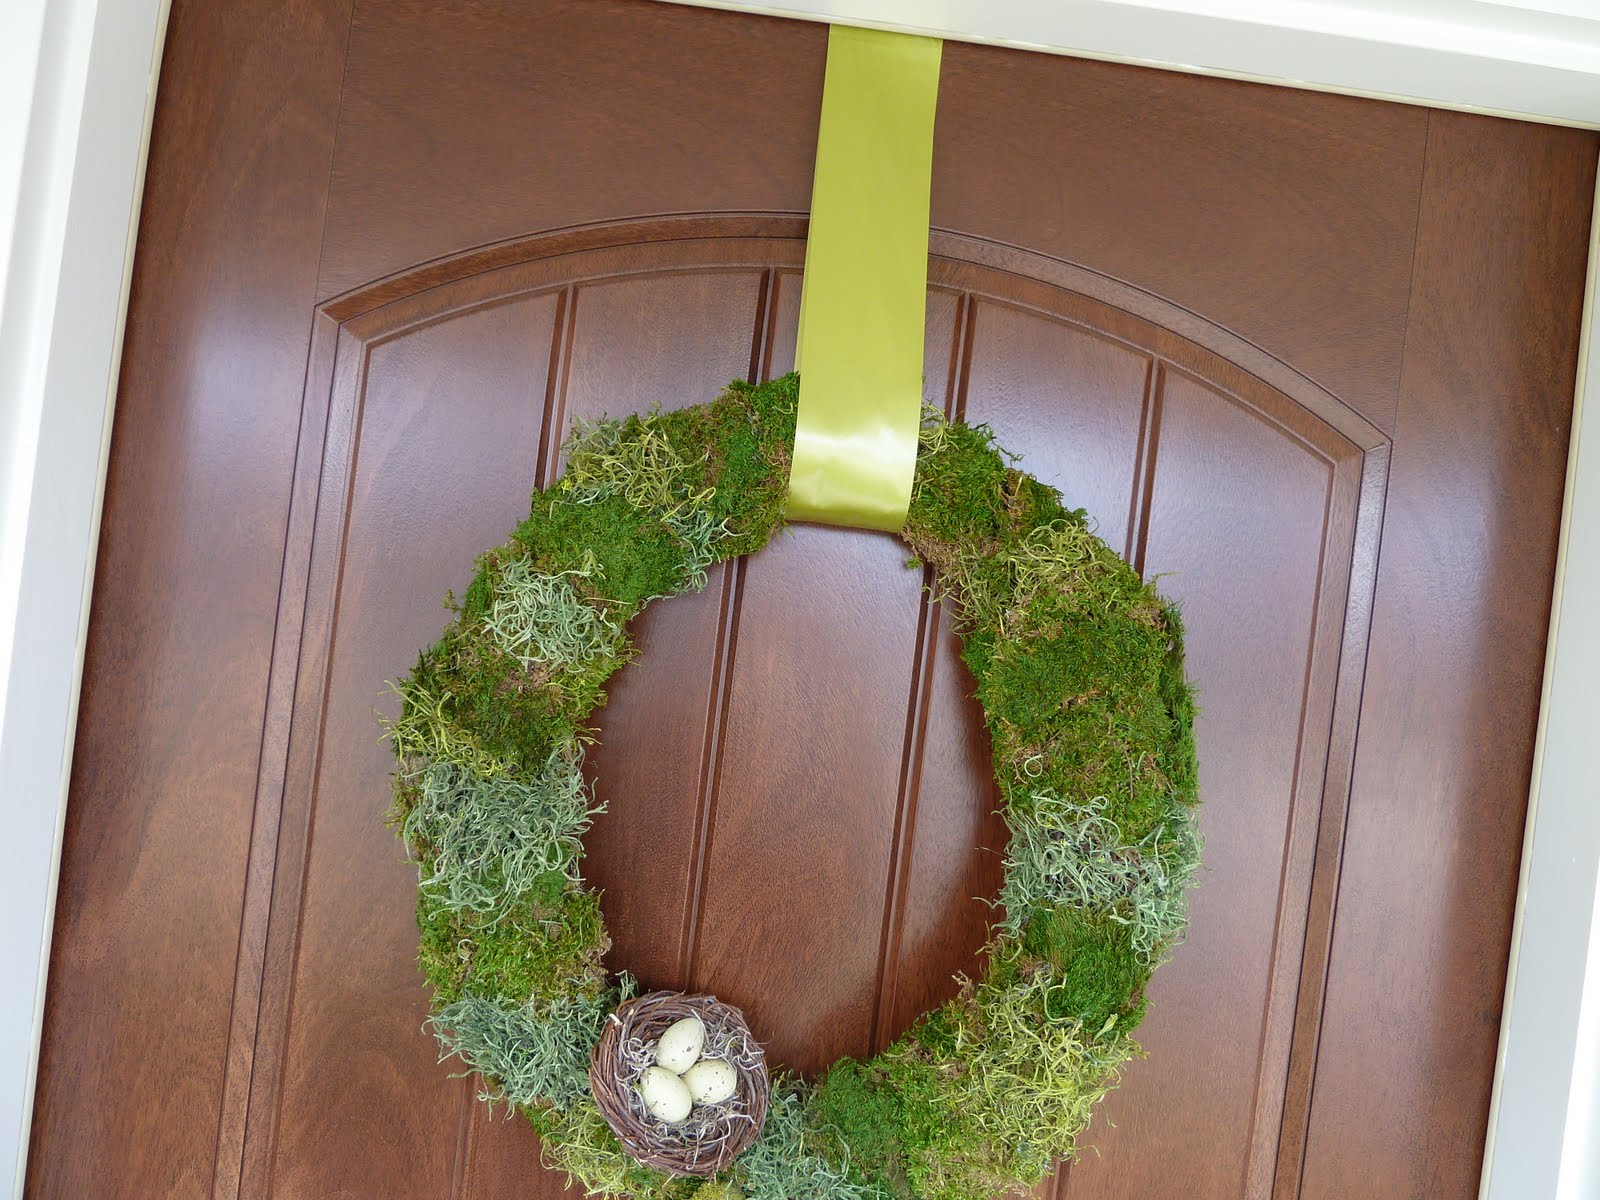
Moss Wreath


In thinking about making a green wreath for St. Patrick's Day I decided to just make a spring wreath to cover me until summer. And a green moss one just happened to look good for St. Patrick's Day and into spring so that's what I went with.

I used a grapevine wreath but if I did it again I'd go with straw or foam since mine is a little misshaped.

Step 1. Lay down a dollar store tablecloth. You'll be glad you did.
Step 2. Glue on your foam. I mixed and matched and looking at it now, I'd probably just go with one kind if I did it again. I used hot glue to adhere to the grapevine but you could certainly use something a little simpler on a foam or straw form.

Step 3. Relish in your good decision to lie down that tablecloth so you can wrap it up and throw it away. That moss is messy stuff!
Step 4. Glue on a nest and some eggs.
Step 5. Step back and enjoy your spring wreath until summer...or fall, depending on how ambitious you get.
My end result has mixed emotions from me. It looks very splotchy. I'd potentially rip it apart and start again but I don't even think I'll use the same wreath so I may just start over from scratch next year. But, this works for now.

Pin It!

Monday, January 24, 2011

Tilano Photo Tile


I had some left over transfer paper and mud from a Tilano Fresco Kit so I used a piece of wood I had, covered it with mud, stained it then transfered on a photo of my niece and her boyfriend. I used this as her Christmas gift and it only cost me the cost of a color copy at Office Depot. I love giving hand made gifts that people actually like.
 

Pin It!

Photo Monogram Letter


I found this wooden letter on clearance for $3 a few months ago and thought it'd make the perfect base for a collage of some type. In an effort to economize my Christmas gifts and make something special for my nieces, it became a Christmas gift. It already had a wall hanger on the back and being wood, I knew it would hold up nicely. It was red so I spray painted it black. Then I printed off black and white pictures of my niece growing up, including several of us together, and used mod podge to glue them on. It turned out looking better than I thought considering I used regular copy paper. She loved it.

Pin It!

Tuesday, June 8, 2010

Moving Announcement


I created a moving announcement and wanted to share the concept with you. I can't share the actual announcement because it has WAY too much personal info on it. I basically created a "flyer" for a Bed & Breakfast with our name and info on it. I printed them on 8 1/2 x 11 glossy paper and had them tri-folded then mailed them out like they were a flyer for a bed and breakfast. It had a picture of our new home, some info on our town then these three pictures and captions in the middle section:

Hot Breakfast Served Daily

Complimentary Wake Up Calls

Jacuzzi Tubs

I then listed that there are "Winter Discounts Available" since we moved to the cold and everyone has said they'll come visit, but only in the summer. I included a map of the city with a star on our town and then our new contact information.

They were so quick and easy compared to the ones I sent last time I moved. I created them on the computer. Kinkos printed and folded them and then I mailed them out. I even found green envelopes with a matching shaped address area that matched after I'd had them printed.

I've gotten many compliments on them and I'm glad I sent them out.

Pin It!

Wednesday, March 10, 2010

Kids Crafts


My niece and her friend spent the night with us this weekend and they always want to do some sort of craft when they come over. They wanted to cover clipboards so they could play school so we headed off to Target. We didn't find your standard clipboards but we did find these:How great is that? 64 different colors of markers in one box???? We had to buy a set. Have you seen these? Is this news to only me? Are they new or did I not get the memo?

We found pink plastic clipboards so I doodled their names and other things for them on each one. I love to doodle with Sharpies.


Then they covered notebooks with scrapbook paper and modpodged over the top.


Pin It!

Sunday, November 1, 2009

Taylor Swift Glitter Guitar


My niece, Greta, dressed up as Taylor Swift for Halloween this year so I helped make her a glitter guitar just like this one.
I cut it out of cardboard, painted it and she came over and helped glue the sequins on. I considered glitter but decided her mom wouldn't be too happy with glitter ALL OVER everything. We added some strings and a ribbon and she was set. So I didn't measure and my circle in the middle wasn't quite centered but she didn't care. I mean, come on, she's five!
Here she is with her glitter guitar and her Taylor wig. She made a great Taylor Swift!

Pin It!

Wednesday, July 1, 2009

Mod Podge Picture Frame


I was at my in-laws today and took a picture of a picture frame my mother-in-law mod podged with my son's picture in it. I loved that she framed his "airplane" picture with an old map. She's very creative.

Pin It!

Tuesday, June 16, 2009

Covered Notebook Journal


I have a brother in law who is leaving on a mission for our church this week. I made this as a quick last minute gift for him. I printed off a picture I have of him looking up at a picture of a statue of Christ then I glued it to a composition notebook and put mod podge over the top so it wouldn't smear. It is simple but gave the notebook a little personalization. I've always loved this picture of him and we have the original because my husband is the one who took the picture years ago.

Pin It!